
Last Updated on September 4, 2023 by RAJENDRAPRASAD
ArrayList in Java in Hindi – Hello दोस्तों rajhindime.in में आपका स्वागत है |
दोस्तों, पिछले post Collections Framework in Java in Hindi में आपने जाना कि Collections क्या है, इसकी जरुरत क्यों पड़ी और Collection Framework की class hierarchy क्या है |
आज के इस post में आप ArrayList के बारे में विस्तार से जानेंगे |
ArrayList:
ArrayList यह List interface का implementation class है |

जब भी हम Array declare करते हैं, तब हमें शुरुआत में ही उसका size declare करना होता है, और एक बार size declare कर दिया तब न तो उसे बढ़ा सकते हैं और न ही घटा |
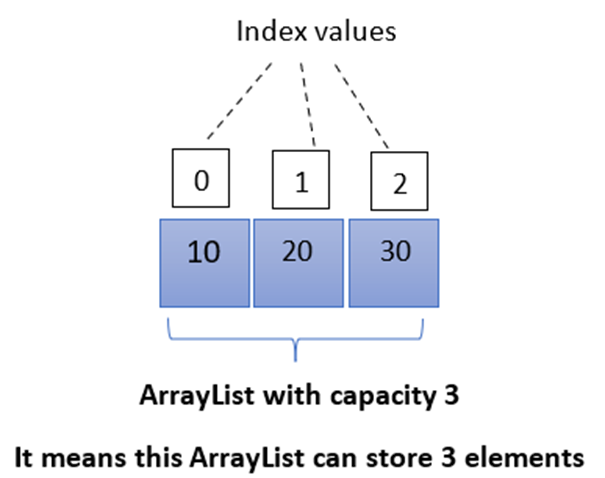
परन्तु, Arraylist में ऐसा नहीं है, यह resizable in nature है, जो element add या remove करने पर अपने size को dynamically बढ़ा या घटा लेता है | इसलिए Arraylist को dynamic Array भी कहते हैं |
इसके element को इसके index value का use करके आसानी से access किया जा सकता है |
Properties of ArrayList:
1. इसका underline data structure, Resizable arrays अथवा Growable array है |
2. ArrayList के पीछे अर्थात backend में Object class के array को use किया गया है |
3. इसमें duplicate elements allowed हैं |
4. यह insertion order को maintain करता है |
5. यह sorting order को follow नहीं करता अर्थात, इसमें data की sorting(बढ़ताक्रम या घटताक्रम) नहीं होती |
6. null insertion allowed है | हम इसमें चाहे जितना null value को add कर सकते हैं |
7. यह TreeSet तथा TreeMap के अलावा किसी भी अन्य heterogeneous object को hold कर सकता है |
8. यह non-synchronized है |
Creation of ArrayList
Arraylist को create करने के लिए java में 3 types के constructor मौजूद हैं |
आइए इन्हे एक-एक करके देखें:
1. constructor with no argument :
Syntax :
ArrayList arrayListName = new ArrayList();
ArrayList को create करते समय अगर हम कोई भी argument pass नहीं करते, उस case में इसके object का initial default size 10 होता है |

जैसे ही ArrayList उसकी maximum capacity पर पहुँचता है, एक new ArrayList create हो जाता है, जिसकी new capacity = (currentCapacity * 3/2)+1 होती है |
Example के लिए, मान लो Arraylist की initial capacity 10 है, और जैसे ही हम 11th element add करेंगे , उसी समय एक new ArrayList create होगा, जिसका size (10*3/2)+1 = 16 होगा |
2. constructor accepting initial capacity
Syntax :
ArrayList arrayListName = new ArrayList(initialCapacity);
ArrayList create करते समय हम उसकी initial capacity भी declare कर सकते हैं, उस case में object का size declare capacity के अनुसार होगा |
Example:
ArrayList al1 = new ArrayList(6);

3. Constructor accepting Collection object
Syntax:
ArrayList arrayListName = new ArrayList(CollectionObject);
ArrayList create करते समय हम उसकी initial capacity के रूप में किसी अन्य Collection object को भी pass कर सकते हैं, उस case में object का size pass किए हुए Collection object के अनुसार होगा |
Example:
ArrayList al2 = new ArrayList();
al2.add(10);
al2.add(20);
al2.add(30);
ArrayList al1 = new ArrayList(al2);
Basic Operations on ArrayList
Arraylist हमें अगल-अगल operation perform करने के लिए बहुत सारे methods provide करता है, आइए एक-एक कर के कुछ common methods को जाने |
Add elements
Access elements
Change elements
Remove elements
1. Add element to ArrayList:
ArrayList में element add करने के अनेकों methods हैं जैसे,
Using Arrays.asList
Using Anonymous inner class Method
Using Collection.nCopies Method
Using add Method
Using Arrays.asList:
इसमें हम एक Array, जिसे Array class के method asList() का use करके list में convert कर दिया हो, उसे parameter के रूप में pass करते हैं |
Syntax:
ArrayList arrayListName = new ArrayList (
arrays.asList (Object o1, Object o2, …, Object on));
Program 1:
import java.util.ArrayList;
import java.util.Arrays;

public class ArrayListDemo {

	public static void main(String[] args) {
		ArrayList al1 = new ArrayList(Arrays.asList("Raj", "Hindi", "Me"));
		System.out.println("List contents: " + al1);
		System.out.println("Second element is: " + al1.get(1));
	}
}
OutPut:
List contents: [Raj, Hindi, Me]
Second element is: Hindi
Explanation:
ऊपर program 1 में, हमनें ArrayList() में parameter के रूप में Arrays.asList(“Raj”, “Hindi”, “Me”) को pass किया है, जो कि एक list है | उसके बाद हमनें ArrayList तथा उसके दूसरे element को print किया है |
Using Anonymous inner class Method:
इसमें हम anonymous inner class का use करके ArrayList में values assign करते हैं |
Syntax:
ArrayList arraylistName = new ArrayList (){{
			add(Object O1); add (Object O2);…
			add (Object On);}};
Program 2:
import java.util.ArrayList;
import java.util.Arrays;

public class ArrayListDemo {

	public static void main(String[] args) {
		ArrayList fruits = new ArrayList() {
			{
				add("Orange");
				add("Mango");
				add("Apple");
				add("Banana");
			}
		};
		System.out.println("List of fruits are : "+fruits);
	}
}
OutPut:
List of fruits are : [Orange, Mango, Apple, Banana]
Explanation:
ऊपर program 2 में, हमने एक anonymous inner class की body
{{add(“Orange”);add(“Mango”);add(“Apple”);add(“Banana”);}};
को pass किया है, उसके बाद print किया है |
Using Collection.nCopies Method:
इसमें हम ArrayList में same ही values add करते हैं, इसमें हम count तथा element pass करते हैं |
Syntax:
ArrayList arrayListName = new
	arrayList(Collections.nCopies(count, element));
Program 3:
import java.util.ArrayList;
import java.util.Collections;

public class ArrayListDemo {

	public static void main(String[] args) {
		// create ArrayList with 4 elements
		// initialized to value INDIA using Collections.nCopies
		ArrayList intList = new ArrayList(Collections.nCopies(4, "INDIA"));
		System.out.println("Content of ArrayList:" + intList);
	}
}
OutPut:
Content of ArrayList:[INDIA, INDIA, INDIA, INDIA]
Explanation:
ऊपर program 3 में, हमने ArayList() में parameter के रूप में Collections.nCopies(4, “INDIA”) pass किया है, जिससे INDIA यह element 4 बार add हुआ है |
Using add Method:
किसी single element को add करने के लिए, हम add() method का use करते हैं |
Syntax :
ArrayList ArraylistName = new ArrayList ();
arraylistName.add(index, element);
ArrayList add() method में 2 parameters pass किए जा सकते हैं :
a. index – जिस index पर element add करना है, यह optional है |
b. element – element जो insert/add करना है |
यदि index parameter pass न किया जाए तब element arraylist के end में append/add हो जाता है |
Program 4:
import java.util.ArrayList;

public class ArrayListDemo {

	public static void main(String[] args) {
		ArrayList al1 = new ArrayList();
		al1.add("Learning");
		al1.add(500);
		al1.add("ArrayList");
		al1.add(200.56);
		al1.add(500);
		al1.add(null);
		System.out.println(al1);
	}
}
OutPut:
[Learning, 500, ArrayList, 200.56, 500, null]
Explanation:
ऊपर program 4 में हमने add() method का use करके Arraylist में String, Integer, null तथा float values को add किया है और उसे print किया है |
NOTE: यहाँ हमने int value 500 को दो बार add किया है, क्योकि duplicate element allowed है |
Program 5:
import java.util.ArrayList;

public class ArrayListDemo {

	public static void main(String[] args) {
		ArrayList al1 = new ArrayList();
		al1.add("Learning");
		al1.add(500);
		al1.add("ArrayList");
		al1.add(200.56);
		System.out.println("Initial element: "+al1);
		al1.add(2, "RajHindiMe"); //adding element at specific Index position
		System.out.println("Modified element: "+al1);
	}
}
OutPut:
Initial element: [Learning, 500, ArrayList, 200.56]
Modified element: [Learning, 500, RajHindiMe, ArrayList, 200.56]
Explanation:
ऊपर program 5 में, हमने String “RajHindiMe” को index position 2 पर add किया है इसलिए modified list में “ArrayList” जिसका index 2 था, उसकी जगह “RajHindiMe” add हो गया और “ArrayList” index 3 पर चला गया |
Using addAll() method:
किसी CollectionObject के सभी elements को add करने के लिए, hum addAll() method का use करते हैं |
Syntax:
ArrayList ArraylistName = new ArrayList ();
arraylistName.addAll(index, CollectionObject);
ArrayList addAll() method में भी 2 parameters pass किए जा सकते हैं :
a. index – जिस index पर element add करना है, यह optional है |
b. CollectionObject – CollectionObject जो insert/add करना है |
यदि index parameter pass न किया जाए तो CollectionObject arraylist के end में append/add हो जाता है |
Program 6:
import java.util.ArrayList;

public class ArrayListDemo {

	public static void main(String[] args) {
		ArrayList al1 = new ArrayList();
		al1.add("Learning");
		al1.add(500);
		al1.add("ArrayList");
		al1.add(200.56);
		System.out.println("Initial element: "+al1);

		ArrayList collectionList = new ArrayList();
		collectionList.add(10);
		collectionList.add("ABC");
		collectionList.add(20);
		al1.addAll(collectionList);	// adding CollectioObject using addAll() method
		System.out.println("Modified element: "+al1);
	}
}
OutPut:
Initial element: [Learning, 500, ArrayList, 200.56]
Modified element: [Learning, 500, ArrayList, 200.56, 10, ABC, 20]
Explanation:
ऊपर program 6 में हमने, एक collectionList name का new ArrayList बनाया है, जिसमें 10,”ABC” और 20 add किया है, उसके बाद उसी collectionList को addAll() method का use करते हुए arrayList al1 में add किया है |
NOTE: Modified element में, collectionList के सारे element last में add हुए हैं |
Program 7:
import java.util.ArrayList;

public class ArrayListDemo {

	public static void main(String[] args) {
		ArrayList al1 = new ArrayList();
		al1.add("Learning");
		al1.add(500);
		al1.add("ArrayList");
		al1.add(200.56);
		System.out.println("Initial element: "+al1);

		ArrayList collectionList = new ArrayList();
		collectionList.add(10);
		collectionList.add("ABC");
		collectionList.add(20);
		al1.addAll(2,collectionList);	// adding CollectioObject using addAll() method at specific index
		System.out.println("Modified element: "+al1);
	}
}
OutPut:
Initial element: [Learning, 500, ArrayList, 200.56]
Modified element: [Learning, 500, 10, ABC, 20, ArrayList, 200.56]
Explanation:
ऊपर program 7 में, हमने ArrayList “collectionList” को index position 2 पर add किया है इसलिए modified list में “ArrayList” जिसका index 2 था, उसकी जगह “collectionList” के सारे element add हो गए और “ArrayList” index 5 पर चला गया |
NOTE: जब add()/addAll() में index position pass नहीं करते तब, elements सबसे last में add होते हैं | add()/addAll() में index position pass करने पर element/collectionObject index के अनुसार add होते है, और arraylist में पहले के element उसके अनुसार adjust हो जाते हैं |
add()/addAll() Return Value:
दोनों ही methods की return value true होती है, यदि element/collectionObject insert/add हो गया हो |
यदि pass किया हुआ index value range के बाहर हो तब यह, IndexOutOfBoundsException exception throw करता है |
Program 8:
import java.util.ArrayList;

public class ArrayListDemo {

	public static void main(String[] args) {
		ArrayList al1 = new ArrayList();
		al1.add("Learning");
		al1.add(500);
		al1.add("ArrayList");
		al1.add(200.56);
		System.out.println("Initial element: "+al1);

		ArrayList collectionList = new ArrayList();
		collectionList.add(10);
		collectionList.add("ABC");
		collectionList.add(20);
		al1.addAll(7,collectionList);// adding CollectioObject using addAll() method at 7th index
		System.out.println("Modified element: "+al1);
	}
}
OutPut:
Initial element: [Learning, 500, ArrayList, 200.56]
Exception in thread "main" java.lang.IndexOutOfBoundsException: Index: 7, Size: 4
	at java.base/java.util.ArrayList.rangeCheckForAdd(ArrayList.java:756)
	at java.base/java.util.ArrayList.addAll(ArrayList.java:700)
	at com.collectionframeworkpractice.ArrayListDemo.main(ArrayListDemo.java:17)
Explanation:
ऊपर program 8 में, हमने CollectionObject “collectionList” को index 7 पर add करना चाहा, जो कि possible नहीं है, क्योकि ArrayList al1 की size 4 है, इसलिए IndexOutOfBoundsException मिला |
2. Access elements form ArrayList:
ArrayList के element को access/read करने के लिए get() method का use करते हैं |
इसमें parameter के रूप में IndexNumber pass करते हैं |
अगर pass किया हुआ indexNumber range के बाहर हो तब यह, IndexOutOfBoundsException exception throw करता है |
Syntax:
ArrayList arrayListName = new ArrayList();
arraylistName.get(IndexNumber);
Program 9:
import java.util.ArrayList;

public class ArrayListDemo {

	public static void main(String[] args) {
		ArrayList fruits = new ArrayList();
		fruits.add("Orange");
		fruits.add("Mango");
		fruits.add("Apple");
		fruits.add("Banana");
		System.out.println("fruit at index 1 : " + fruits.get(1));
		System.out.println("fruit at index 0 : " + fruits.get(0));
		System.out.println("fruit at index 8 : " + fruits.get(8));
	}
}
OutPut:
fruit at index 1 : Mango
fruit at index 0 : Orange
Exception in thread "main" java.lang.IndexOutOfBoundsException: Index 8 out of bounds for length 4
	at java.base/jdk.internal.util.Preconditions.outOfBounds(Preconditions.java:64)
	at java.base/jdk.internal.util.Preconditions.outOfBoundsCheckIndex(Preconditions.java:70)
	at java.base/jdk.internal.util.Preconditions.checkIndex(Preconditions.java:248)
	at java.base/java.util.Objects.checkIndex(Objects.java:359)
	at java.base/java.util.ArrayList.get(ArrayList.java:427)
	at com.collectionframeworkpractice.ArrayListDemo.main(ArrayListDemo.java:13)
Explanation:
ऊपर program 9 में, हमने fruits.get(1) तथा fruits.get(0) use किया जिससे output “Mango” तथा “Orange” मिला |
परन्तु जब हमने fruits.get(8) access करना चाहा जो कि possible नहीं है क्योकि fruits का size 4 ही है, इसलिए IndexOutOfBoundsException मिला |
3.Change ArrayList Elements:
ArrayList के element को change करने के लिए set() method का use करते हैं |
Syntax :
ArrayList ArraylistName = new ArrayList ();
arraylistName.set(index, element);
ArrayList set() method में 2 parameters pass किए जाते हैं :
a. index – जिस index के element को change करना है |
b. element – element जो insert/add करना है |
Program 10:
import java.util.ArrayList;
import java.util.ArrayList;

public class ArrayListDemo {

	public static void main(String[] args) {
		ArrayList fruits = new ArrayList();
		fruits.add("Orange");
		fruits.add("Mango");
		fruits.add("Apple");
		fruits.add("Banana");
		System.out.println("Initial fruit list : " + fruits);
		fruits.set(2, "Watermelon");
		System.out.println("Modified fruit list : " + fruits);
		fruits.set(7, "Pinepple");
		System.out.println("Modified fruit list2 : " + fruits);
	}
}
OutPut:
Initial fruit list : [Orange, Mango, Apple, Banana]
Modified fruit list : [Orange, Mango, Watermelon, Banana]
Exception in thread "main" java.lang.IndexOutOfBoundsException: Index 7 out of bounds for length 4
	at java.base/jdk.internal.util.Preconditions.outOfBounds(Preconditions.java:64)
	at java.base/jdk.internal.util.Preconditions.outOfBoundsCheckIndex(Preconditions.java:70)
	at java.base/jdk.internal.util.Preconditions.checkIndex(Preconditions.java:248)
	at java.base/java.util.Objects.checkIndex(Objects.java:359)
	at java.base/java.util.ArrayList.set(ArrayList.java:441)
	at com.collectionframeworkpractice.ArrayListDemo.main(ArrayListDemo.java:15)
Explanation:
ऊपर program 10 में, हमने fruits.set(2, “Watermelon”) का use करते हुए, index 2 की value को Apple से Watermelon में बदल दिया है, इसलिए हमें Modified fruit list : [Orange, Mango, Watermelon, Banana] मिला |
परन्तु, जब हमने fruits.set(7, “Pinepple”) use करके index 7 की value को change करना चाहा जो कि possible ही नहीं है क्योकि fruits का size 4 ही है, इसलिए IndexOutOfBoundsException मिला |
4.Remove ArrayList Elements:
ArrayList में element remove करने के 2 methods हैं |
remove() method
removeAll(method)
Using remove() method :
किसी single element को remove करने के लिए remove() method का use करते हैं |
Syntax :
ArrayList ArraylistName = new ArrayList ();
arraylistName.remove(index);
ArrayList remove() method में सिर्फ 1 parameter pass किया जाता है :
a. index – जिस index के element को remove करना हो |
specified index का element remove होने के बाद, बाकी के element, अपने index position को आपस में adjust कर लेते हैं |
Program 11:
import java.util.ArrayList;

public class ArrayListDemo {

	public static void main(String[] args) {
		ArrayList fruits = new ArrayList();
		fruits.add("Orange");
		fruits.add("Mango");
		fruits.add("Apple");
		fruits.add("Banana");
		System.out.println("Initial fruit list : " + fruits);
		fruits.remove(1);
		System.out.println("Modified fruit list : " + fruits);
		fruits.remove(9);
		System.out.println("Modified fruit list2 : " + fruits);
	}
}
OutPut:
Initial fruit list : [Orange, Mango, Apple, Banana]
Modified fruit list : [Orange, Apple, Banana]
Exception in thread "main" java.lang.IndexOutOfBoundsException: Index 9 out of bounds for length 3
	at java.base/jdk.internal.util.Preconditions.outOfBounds(Preconditions.java:64)
	at java.base/jdk.internal.util.Preconditions.outOfBoundsCheckIndex(Preconditions.java:70)
	at java.base/jdk.internal.util.Preconditions.checkIndex(Preconditions.java:248)
	at java.base/java.util.Objects.checkIndex(Objects.java:359)
	at java.base/java.util.ArrayList.remove(ArrayList.java:504)
	at com.collectionframeworkpractice.ArrayListDemo.main(ArrayListDemo.java:14)
Explanation:
ऊपर program 11 में, हमने fruits.remove(1) का use करते हुए, index 1 की value को remove कर दिया, इसलिए हमें Modified fruit list : [Orange, Apple, Banana]
मिला |
परन्तु, जब हमने fruits.remove(9) use करके index 9 की value को remove करना चाहा जो कि possible ही नहीं है क्योकि fruits का size 4 ही है, इसलिए IndexOutOfBoundsException मिला |
NOTE: यहाँ index 1 का initial value जो कि Mango था, वह delete हो गया और उसकी जगह Banana आ गया, इस तरह अब ArrayList का size 3 हो गया है |
Program 12:
import java.util.ArrayList;
import java.util.Arrays;

public class ArrayListDemo {

	public static void main(String[] args) {
		ArrayList fruits = new ArrayList();
		fruits.add(10);
		fruits.add("Mango");
		fruits.add(20);
		fruits.add(60);
		fruits.add('A');
		System.out.println("Initial fruit list : " + fruits);
		fruits.remove("Mango");
		System.out.println("Modified fruit list : " + fruits);
		fruits.remove(20);
		System.out.println("Modified fruit list2 : " + fruits);
	}
}
OutPut:
Initial fruit list : [10, Mango, 20, 60, A]
Modified fruit list : [10, 20, 60, A]
Exception in thread "main" java.lang.IndexOutOfBoundsException: Index 20 out of bounds for length 4
	at java.base/jdk.internal.util.Preconditions.outOfBounds(Preconditions.java:64)
	at java.base/jdk.internal.util.Preconditions.outOfBoundsCheckIndex(Preconditions.java:70)
	at java.base/jdk.internal.util.Preconditions.checkIndex(Preconditions.java:248)
	at java.base/java.util.Objects.checkIndex(Objects.java:359)
	at java.base/java.util.ArrayList.remove(ArrayList.java:504)
	at com.collectionframeworkpractice.ArrayListDemo.main(ArrayListDemo.java:16)
Explanation:
ऊपर program 12 में, ArrayList fruits में [10, Mango, 20, 60, A] हैं | जब हमने fruits.remove(“Mango”) use किया तब वह बिना कोई error दिए remove हो गया | परन्तु जैसे ही हमने fruits.remove(20) use किया, तुरंत IndexOutOfBoundsException मिला |
NOTE: remove() method में, index की जगह जब हम String value pass करते हैं, तब वह उसे object समझता है, परन्तु int तथा char value pass करने पर वह उसे हमेशा index समझता करता है |
Using removeAll() method :
किसी collectionObject के सारे elements को remove करने के लिए removeAll() method का use करते हैं |
Syntax :
ArrayList ArraylistName = new ArrayList ();
arraylistName.removeAll(collectionObject);
ArrayList removeAll() method में भी सिर्फ 1 ही parameter pass किया जाता है :
a. collectionObject – जिस collectioObject के सभी elements को remove करना हो | element remove होने के बाद, बाकी के elements, अपने index position को आपस में adjust कर लेते हैं |
Program 13:
import java.util.ArrayList;

public class ArrayListDemo {

	public static void main(String[] args) {
		ArrayList fruits = new ArrayList();
		fruits.add("Orange");
		fruits.add("Mango");
		fruits.add("Apple");
		fruits.add("Banana");
		System.out.println("Initial fruit list : " + fruits);
		fruits.removeAll(fruits);
		System.out.println("Modified fruit list : " + fruits);
	}
}
OutPut:
Initial fruit list : [Orange, Mango, Apple, Banana]
Modified fruit list : []
Explanation:
ऊपर program 13 में, हमने fruits.removeAll(fruits) का use करके arrayList के सारे elements delete कर दिए, जिससे हमें modified fruit list के रूप में [ ] empty arraylist मिला |
Program 14:
import java.util.ArrayList;

public class ArrayListDemo {

	public static void main(String[] args) {
		ArrayList fruits = new ArrayList();
		fruits.add("Orange");
		fruits.add("Mango");
		fruits.add("Apple");
		fruits.add("Banana");
		System.out.println("Initial fruit list : " + fruits);
		ArrayList fruits2 = new ArrayList();
		fruits2.add("Orange");
		fruits2.add("Apple");
		fruits.removeAll(fruits2);
		System.out.println("Modified fruit list : " + fruits);
	}
}
OutPut:
Initial fruit list : [Orange, Mango, Apple, Banana]
Modified fruit list : [Mango, Banana]
Explanation:
ऊपर program 14 में हमने fruits.removeAll(fruits2) का use करके, fruits2 के सारे elements(Orange और Apple), list fruits में से remove कर दिए, जिससे Modified fruit list : [Mango, Banana] मिला |
Program 15:
import java.util.ArrayList;
import java.util.Arrays;

public class ArrayListDemo {

	public static void main(String[] args) {
		ArrayList fruits = new ArrayList();
		fruits.add("Orange");
		fruits.add("Mango");
		fruits.add("Apple");
		fruits.add("Kiwi");
		fruits.add("Banana");
		fruits.add("Banana");
		System.out.println("Initial fruit list : " + fruits);
		ArrayList fruits2 = new ArrayList(Arrays.asList("Mango","Pear","Date","Banana","Orange"));
		fruits.removeAll(fruits2);
		System.out.println("Modified fruit list : " + fruits);
	}
}
OutPut:
Initial fruit list : [Orange, Mango, Apple, Kiwi, Banana, Banana]
Modified fruit list : [Apple, Kiwi]
Explanation:
ऊपर program 15 में, ArrayList fruits में [Orange, Mango, Apple, Kiwi, Banana, Banana] थे और ArrayList fruits2 में [Mango, Pear, Date, Banana, Orange] थे | फिर हमने fruits.removeAll(fruits2) का use किया |
NOTE: यहाँ fruits and fruits2 दोनों Arraylist में जो भी common elements थे वह सभी remove हुए हैं (Banana की दो entry थी, दोनों remove हुई हैं)
दोस्तों, अब तक हमने add(), addAll(), get(), set(), remove(), removeAll() methods के बारे में जाना |
इसके अलावा भी कुछ methods हैं, जिसका use अधिकतर किया जाता है |
| Methods | Descriptions |
| clear() | यह ArrayList के सारे elements को remove कर देता है | |
| contains(Object o) | यदि specified element ArrayList में majood हो, तब यह true value return करता है | |
| indexOf(Object o) | यह specified element के सबसे पहले index को return करता है, यदि element मौजूद न हो तब -1 value return करता है | |
| lastIndexOf(Object o) | यह specified element के सबसे last index को return करता है, यदि element मौजूद न हो तब -1 value return करता है | |
| isEmpty() | यदि Arraylist में कोई भी value present न हो, तब यह true value return करता है | |
| size() | यह ArrayList में मौजूद सभी elements के count return करता है | |
| toArray() | यह एक Array return करता है, जिसमें ArrayList के सभी elements, उसके sequence /order के हिसाब से मौजूद होते हैं |सरल शब्दों में कहें तो यह ArrayList को Array में convert कर देता है | |
Iterating through ArrayList:
ArrayList को iterate करने के बहुत सारे तरीके हैं, परन्तु इस post में हम सिर्फ for loop का use करेंगे |
Program 16:
import java.util.ArrayList;

public class ArrayListDemo {

	public static void main(String[] args) {
		ArrayList al1 = new ArrayList();
		al1.add("Learning");
		al1.add('B');
		al1.add("ArrayList");
		al1.add(200.56);
		al1.add(500);
		al1.add(null);
		for(int i=0;i<al1.size();i++) {
			System.out.println("Value at index position "+i+" is: "+al1.get(i));
		}
	}
}
OutPut:
Value at index position 0 is: Learning
Value at index position 1 is: B
Value at index position 2 is: ArrayList
Value at index position 3 is: 200.56
Value at index position 4 is: 500
Value at index position 5 is: null
Explanation:
ऊपर program 16 में, हमने for look का use करते हुए ArrayList al1 के सारे elements को print किया है |
Creating Generic ArrayList:
दोस्तों अब तक हमने ऐसे ArrayList create किए जिसमें हम किसी भी heterogeneous object को add कर सकते हैं |
परन्तु, Java हमें यह भी सुविधा देता है कि हम, ArrayList में add होने वाले elements के data type को पहले से ही define कर सके | इसके लिए हमे ArrayList को create करते समय उसे generic declare करना होगा, <> का use करके|
Condition सिर्फ इतना है कि जो data type declare किया, ArrayList में सिर्फ उसी data type की value add कर सकते हैं, उसके अलावा कोई अन्य data type की value add करने पर compile time error मिलेगा |
इसलिए जब हम पूरी तरह से निश्चिंत हो कि कौन सा data type add करना है, तभी generic का use करें |
Syntax:
ArrayList<dataType> arrayListName = new ArrayList<dataType> ();
ArrayList<dataType> arrayListName = new ArrayList<dataType> (initialCapacity);
ArrayList<dataType> arrayListName = new ArrayList<dataType> (CollectionObject);
Program 17:
import java.util.ArrayList;
import java.util.Arrays;

public class ArrayListDemo {

	public static void main(String[] args) {
		ArrayList<String> al1 = new ArrayList<String>();
		al1.add("Urmila");
		al1.add("Janhvi");
		System.out.println("Initial list"+al1);
		al1.add(250);
		System.out.println("Modified list"+al1);
	}
}
OutPut:
Exception in thread "main" java.lang.Error: Unresolved compilation problem:
	The method add(int, String) in the type ArrayList<String> is not applicable for the arguments (int)

	at com.collectionframeworkpractice.ArrayListDemo.main(ArrayListDemo.java:11)
Explanation:
ऊपर program 17 में, हमने generic के रूप में <String> declare किया है | यहाँ हमें line 11 पर compile time error मिला, क्योकि हम यहाँ Integer value add करना चाह रहे हैं |
Program 18:
import java.util.ArrayList;
import java.util.Arrays;

public class ArrayListDemo {

	public static void main(String[] args) {
		ArrayList<Integer> al1 = new ArrayList<Integer>();
		al1.add(200);
		al1.add(300);
		System.out.println("al1 list"+al1);

		ArrayList<String> al2 = new ArrayList<String>(al1);
		System.out.println("al2 list"+al2);
	}
}
OutPut:
Exception in thread "main" java.lang.Error: Unresolved compilation problem:
	The constructor ArrayList<String>(ArrayList<Integer>) is undefined

	at com.collectionframeworkpractice.ArrayListDemo.main(ArrayListDemo.java:12)
Explanation:
ऊपर program 18 में, हमने ArrayList al1 में generic के रूप में <Integer> तथा ArrayList al2 में generic के रूप में <String> declare किया है | यहाँ हमें line 12 पर compile time error मिला, क्योकि हम यहाँ Integer ArrayList(al1) को String ArrayList(al2) में पास कर रहे हैं |
Conclusion – आज आपने क्या सीखा
इस post में आपने ArrayList, उसके declaration, Constructor , methods ,Iteration तथा Generic ArrayList इन सब के बारे में विस्तार से जाना |
आशा है कि, आपको मेरा यह Blog ArrayList in Java in Hindi जरूर पसंद आया होगा |
अगर आप इस post से related कोई सवाल पूँछना चाहते हैं अथवा कोई सुझाव देना चाहते हैं तो comment करके जरूर बताएं, मैं उसका reply जरूर दूँगा |
इस post को अपना कीमती समय देने के लिए बहुत बहुत धन्यवाद् | फिर मिलेंगें |